Building a Switch-based Network (Tugas 2)

0 komentar

Indra Purnama
11108021
3KA15

Jaringan Komputer


Objective

  • Create a simple network with two PCs using a switch
  • Identify the proper cable to connect the PCs to the switch
  • Configure workstation IP address information
  • Test connectivity using the ping command.

Background / Preparation
This lab focuses on the ability to connect two PCs to create a simple switch-based Ethernet LAN using two workstations. A switch is a networking concentration device sometimes referred to as a multiport bridge. Switches are relatively inexpensive and easy to install. When operating in full-duplex mode, they provide dedicated bandwidth to workstations. Switches eliminate collisions by creating microsegments between ports to which the two workstations are attached. They are appropriate for small to large LANs with moderate to heavy traffic. In addition to the physical and data link connections, which are Layers 1 and 2, the computers must also be configured with the correct IP network settings, which is Layer 3, so that they can communicate. Since this lab uses a switch, a basic Category 5/5e UTP straight-through cable is needed to connect each PC to the switch. This is referred to as a patch cable or horizontal cabling, which is used to connect workstations and a typical LAN. Start this lab with the equipment turned off and with cabling disconnected. Work in teams of two with one person per PC. The following resources will be required:
  • Two workstations with an Ethernet 10/100 NIC installed
  • Ethernet 10BaseT or Fast Ethernet hub
  • Several Ethernet cables, which are straight-through and crossover, to choose from for connecting the two workstations

Step 1 Identify the proper Ethernet cable and connect the two PCs
  1. The connection between the two PCs and the switch will be accomplished using a Category 5 or 5e straight-through patch cable. Locate two cables that are long enough to reach from each PC to the switch. Attach one end to the NIC and the other end to a port on the switch. Be sure to examine the cable ends carefully and select only a straight-through cable.
  2. What kind of cable is required to connect from NIC to hub? Straight Through Cable
  3. What is the category rating of the cable? Category 5 or 5e
  4. What is the AWG wire size designation of the cable? 24 AWG


Step 2 Verify the physical connection
  1. Plug in and turn on the computers. To verify the computer connections, insure that the link lights on both NICs are lit. Are both link lights lit? They should be, otherwise troubleshoot.

Step 3 Access the IP settings window
Note: Be sure to write down the existing IP settings, so that they can be restored at the end of the lab. These include IP address, subnet mask, default gateway, and DNS servers. If the workstation is a DHCP client, it is not necessary to record this information.

Windows 95 / 98 / Me/ users should do the following:
  • Click on Start > Settings > Control Panel and then click the Network icon.
  • Select the TCP/IP protocol icon that is associated with the NIC in this PC and click on Properties.
  • Click on the IP Address tab and the Gateway tab.

Windows NT / 2000 users should do the following:
  • Click on Start > Settings > Control Panel and then open the Network and Dial-up Connections folder.
  • Click ad open the Local Area Connection icon.
  • Select the TCP/IP protocol icon that is associated with the NIC in this PC.
  • Click on Properties and click on Use the following IP address.

Windows XP users should do the following:
  • Click on Start > Settings > Control Panel and then click the Network Connection icon.
  • Select the Local Area Network Connection and click on Change settings of this connection.
  • Select the TCP/IP protocol icon that is associated with the NIC in this PC.
  • Click on Properties and click on Use the following IP address.

See the example below:


Step 4 Configure TCP/IP settings for the two PCs

  1. Set the IP address information for each PC according to the information in the table.
  2. Note that the default gateway IP address is not required, since these computers are directly connected. The default gateway is only required on local area networks that are connected to a router.


Computer IP Address Subnet mask Default Gateway
PC – A 192.168.1.1 255.255.255.0 Not Required
PC – B 192.168.1.2 255.255.255.0 Not Required


Step 5 Access the Command or MS-DOS prompt
Use the Start menu to open the Command Prompt (MS-DOS-like) window:
Windows 95 / 98 / Me users should do the following:
Start > Programs > MS-DOS Prompt

Windows NT / 2000 users should do the following:
Start > Programs > Accessories > Command Prompt

Windows XP users should do the following:
Start > Programs > Accessories > Command Prompt

Step 6 Verify that the PCs can communicate
  • Test connectivity from one PC to the other by pinging the IP address of the opposite computer. Use the following command at the command prompt.
C:>ping 192.168.1.1 (or 192.168.1.2)
  • Look for results similar to those shown below. If not, check the PC connections and TCP/IP settings for both PCs. What was the ping result?
PC>ping 192.168.1.1

Pinging 192.168.1.1 with 32 bytes of data:
Reply from 192.168.1.1: bytes=32 time=17ms TTL=128
Reply from 192.168.1.1: bytes=32 time=7ms TTL=128
Reply from 192.168.1.1: bytes=32 time=9ms TTL=128
Reply from 192.168.1.1: bytes=32 time=10ms TTL=128

Ping statistics for 192.168.1.1:
Packets: Sent = 4, Received = 4, Lost = 0 (0% loss),
Approximate round trip times in milli-seconds:
Minimum = 7ms, Maximum = 17ms, Average = 10ms


Step 7 Confirm the TCP/IP network settings
Windows 95 / 98 / Me users should do the following:
  • Type the winipcfg command from the MS-DOS Prompt. Record the results:
PC>ipconfig

IP Address......................: 192.168.1.2
Subnet Mask.....................: 255.255.255.0
Default Gateway.................: 0.0.0.0

Windows NT / 2000 / XP users should do the following:
  • Type the ipconfig command from the Command Prompt. Record the results:
PC>ipconfig

IP Address......................: 192.168.1.1
Subnet Mask.....................: 255.255.255.0
Default Gateway.................: 0.0.0.0


Step 8 Restore the PCs to their original IP settings, disconnect the equipment, and store the cables

Building a Peer-to-Peer Network – Instructor Version (Tugas)

0 komentar

Indra Purnama
11108021
3KA15

Jaringan Komputer


Objective

  • Create a simple peer-to-peer network between two PCs
  • Identify the proper cable to connect the two PCs
  • Configure workstation IP address information
  • Test connectivity using the ping command.

Background / Preparation
This lab focuses on the ability to connect two PCs to create a simple peer-to-peer Ethernet LAN between
two workstations. The workstations will be directly connected to each other without using a hub or switch. In addition to the Layer 1 physical and Layer 2 data link connections, the computers must also be configured with the correct IP network settings, which is Layer 3, so that they can communicate. A basic Category 5/5e UTP crossover cable is all that is needed. A crossover cable is the same type that would be used as backbone or vertical cabling to connect switches together. Connecting the PCs in this manner can be very useful for transferring files at high speed and for troubleshooting interconnecting devices between PCs. If the two PCs can be connected with a single cable and are able to communicate, then any networking problems are not with the PCs themselves. Start this lab with the equipment turned off and with cabling disconnected. Work in teams of two with one person per PC. The following resources will be required:
  • Two workstations with an Ethernet 10/100 NIC installed
  • Several Ethernet cables, which are both straight-through and crossover, to choose from for connecting the two workstations
Step 1 Identify the proper Ethernet cable and connect the two PCs
  1. The connection between the two PCs will be accomplished using a Category 5 or 5e crossover cable. Locate a cable that is long enough to reach from one PC to the other, and attach one end to the NIC in each of the PCs. Be sure to examine the cable ends carefully and select only a crossover cable.
  2. What kind of cable is required to connect from NIC to NIC? Crossover
  3. What is the category rating of the cable? Category 5 or 5e
  4. What is the AWG wire size designation of the cable? 24 AW


Step 2 Verify the physical connection
  1. Plug in and turn on the computers. To verify the computer connections, insure that the link lights on both NICs are lit. Are both link lights lit? They should be otherwise troubleshoot.
Step 3 Access the IP settings window
Note: Be sure to write down the existing IP settings, so that they can be restored at the end of the lab. These include IP address, subnet mask, default gateway, and DNS servers. If the workstation is a DHCP client, it is not necessary to record this information.
Windows 95 / 98 / Me/ users should do the following:
  • Click on Start > Settings > Control Panel and then click the Network icon.
  • Select the TCP/IP protocol icon that is associated with the NI
    C in this PC and click on Properties.
  • Click on the IP Address tab and the Gateway tab.
Windows NT / 2000 users should do the following:
  • Click on Start > Settings > Control Panel and then open t
    he Network and Dial-up Connections folder.
  • Click ad open the Local Area Connection icon.
  • Select the TCP/IP protocol icon that is associated with the NIC in this PC.
  • Click on Properties and click on Use the following IP address.
Windows XP users should do the following:
  • Click on Start > Settings > Control Panel and then click the Network Connection icon.
  • Select the Local Area Network Connection and click on Change settings of this connection.
  • Select the TCP/IP protocol icon that is associated with the NIC in this PC.
  • Click on Properties and click on Use the following IP address.
See the example below:


Step 4 Configure TCP/IP settings for the two PCs
  1. Set the IP address information for each PC according to th e i
    nformation in the table.
  2. Note that the default gateway IP address is not require d, since these computers are directly connected. The default gateway is only required on local area networks that are connected to a router.

Computer IP Address Subnet mask Def ault Gateway
PC – A 192.168.1.1 255.255.255.0 Not Required
PC – B 192.168.1.2 255.255.255.0 Not Req uired


Step 5 Access the Command or MS-DOS prompt
Use the Start menu to open the Command Prompt (MS-DOS-like) window:
Windows 95 / 98 / Me users should do the following:
Start > Programs > MS-DOS Prompt
Windows NT / 2000 users should do the following:
Start > Programs > Accessories > Command Prompt
Windows XP users should do the following:
Start > Programs > Accessories > Command Prompt

Step 6 Verify that the PCs can communicate
  • Test connectivity from one PC to the other by pinging the IP address of the opposite computer. Use the following command at the command promp
    t.
C:>ping 192.168.1.1 (or 192.168.1.2)
  • Look for results similar to those shown below. If not, check th e PC connections and TCP/IP settings for both PCs. What was the ping result?
Results could possibly be: Sent=4 Received=3 Lost=1 (this is due to AR P)
Any other results probably indicate an error


Step 7 Confirm the TCP/IP network settings
Windows 95 / 98 / Me users should do the following:
  1. Type the winipcfg command from the MS-DOS Prompt. R ecord the results:
Answers will vary depending on if Computer A or B is used.
Examples for Computer A
IP Address: 192.168.1.1
Subnet Mask: 255.255.255.0
Default Gateway:

Windows NT / 2000 / XP users should do the following:
  1. Type the ipconfig command from the Command Prompt. Record the results:
Answers will vary depending on if Computer A or B is used.
Examples for Computer B
IP Address: 192.168.1.2
Subnet Mask: 255.255.255.0
Default Gateway:


Step 8 Restore the PCs to their original IP settings, disconnect the equipment, and store the cables

Building a Hub-based Network (Tugas 1)

0 komentar

Indra Purnama

11108021
3KA15


Jaringan Komputer


Objective

  • Create a simple network with two PCs using a hub
  • Identify the proper cable to connect the PCs to the hub
  • Configure workstation IP address information
  • Test connectivity using the ping command.


Background / Preparation

This lab focuses on the ability to connect two PCs to create a simple hub-based Ethernet LAN using two workstations. A hub is a networking concentration device sometimes referred to as a multiport repeater. Hubs are inexpensive and easy to install, but they permit collisions to occur. They are appropriate for a small LAN with light traffic. In addition to the physical and data link connections, which are Layers 1 and 2, the computers must also be configured with the correct IP network settings, which is Layer 3, so that they can communicate. Since

this lab uses a hub, a basic Category 5/5e UTP straight-through cable is needed to connect each PC to the hub. This is referred to as a patch cable or horizontal cabling, which is used to connect workstations and a typical LAN. Start this lab with the equipment turned off and w

ith cabling disconnected. Work in teams of two with one person per PC. The following resources will be required:

  • Two workstations with an Ethernet 10/100 NIC installed
  • Ethernet 10BaseT or Fast Ethernet hub
  • Several Ethernet cables, which are straight-through and crossover, to choose from for connecting the two workstations


Step 1 Identify the proper Ethernet cable and connect the two PCs

  1. The connection between the two PCs and the hub will be accomplished using a Category 5 or 5e straight-through patch cable. Locate two cables tha t are long enough to reach from each PC to the hub. Attach one end to the NIC and the other end to a port on the hub. Be sure to examine the cable ends carefully and select only a straight-through cable.
  2. What kind of cable is required to connect from NIC to hub? Strai ght Through Cable
  3. What is the category rating of the cable? Category 5 or 5e
  4. What is the AWG wire size designation of the cable? 24 AWG

Step 2 Verify the physical connection

  1. Plug in and turn on the computers. To verify the computer connections, insure that the link lights on both NICs are lit. Are both link lights lit? They should be, otherwise troubleshoot.


Step 3 Access the IP settings window

Note: Be sure to write down the existing IP settings, so that they can be restored at the end of the lab. These include IP address, subnet mask, default gateway, and DNS servers. If the workstation is a DHCP client, it is not necessary to record this information.

Windows 95 / 98 / Me/ users should do the following:

  • Click on Start > Settings > Control Panel and then click the Network icon.
  • Select the TCP/IP protocol icon that is associated with the NIC in this PC and click on Properties.
  • Click on the IP Address tab and the Gateway tab.


Windows NT / 2000 users should do the following:

  • Click on Start > Settings > Control Panel and then open the Network and Dial-up Connections folder.
  • Click ad open the Local Area Connection icon.
  • Select the TCP/IP protocol icon that is associated with the NIC in this PC.
  • Click on Properties and click on Use the following IP address.


Windows XP users should do the following:

  • Click on Start > Settings > Control Panel and then click the Network Connection icon.
  • Select the Local Area Network Connection and click on Change settings of this connection.
  • Select the TCP/IP protocol icon that is associated with the NIC in this PC.
  • Click on Properties and click on Use the following IP addre ss.


See the example below:

Step 4 Configure TCP/IP settings for the two PCs

  1. Set the IP address information for each PC according to the information in the table.
  2. Note that the default gateway IP address is not required, since these computers are directly connected. The default gateway is only required on local a rea networks that are connected to a router.

Computer

IP Address

Subnet mask

Default Gateway

PC – A

192.168.1.1

255.255.255.0

Not Required

PC – B

192.168.1.2

255.255.255.0

Not Required

Step 5 Access the Command or MS-DOS prompt
Use the Start menu to open the Command Prompt (MS-DOS-like) window:
Windows 95 / 98 / Me users should do the following:
Start > Programs > MS-DOS Prompt

Windows NT / 2000 users should do the following:
Start > Programs > Accessories > Command Prompt

Windows XP users should do the following:

Start > Programs > Accessories > Command Prompt


Step 6 Verify that the PCs can communicate

  • Test connectivity from one PC to the other by pinging the IP address of the opposite computer. Use the following command at the command prompt.

C:>ping 192.168.1.1 (or 192.168.1.2)

  • Look for results similar to those shown below. If not, check the PC connections and TCP/IP settings for both PCs. What was the ping result?

PC>ping 192.168.1.2

Pinging 192.168.1.2 with 32 bytes of data:

Reply from 192.168.1.2: bytes=32 time=16ms TTL=128
Reply from 192.168.1.2: bytes=32 time=7ms TTL=12
8
Reply from 192.168.1.2: bytes=32 time=7ms TTL=128
Reply from 192.168.1.2: bytes=32 time=6ms TTL=128

Ping statistics for 192.168.1.2:
Packets: Sent = 4, Received = 4, Lost = 0 (0% loss),
Approximate round trip times in milli-seconds:
Minimum = 6ms, Maximum = 16ms, Average = 9ms


Step 7 Confirm the TCP/IP network settings
Windows 95 / 98 / Me users should do the following:

  • Type the winipcfg command from the MS-DOS Prompt. Record the results:

PC>ipconfig

IP Address......................: 192.168.1.1

Subnet Mask.....................: 255.255.255.0

Default Gateway.................: 0.0.0.0


Windows NT / 2000 / XP users should do the following:

  • Type the ipconfig command from the Command Prompt. Record the results:

PC>ipconfig

IP Address......................: 192.168.1.2

Subnet Mask.....................: 255.255.255.0

Default Gateway.................: 0.0.0.0


Step 8 Restore the PCs to their original IP settings, disconnect the equipment, and store the cables

Laporan Kegiatan

0 komentar

Nama : Indra Purnama

Kelas : 3KA15

NPM : 11108021


LAPORAN PELAKSANAAN

KEGIATAN EKSTRA KURIKULER PRAMUKA

SMA NEGERI 1 Tambun Selatan

TAHUN 2007/2008

A. Pendahuluan

1. Latar Belakang

Kegiatan Ekstra Kurikuler adalah kegiatan pendidikan di luar mata pelajaran dan pelayanan konseling untuk membantu pengembangan peserta didik sesuai dengan kebutuhan, potensi, bakat, dan minat mereka melalui kegiatan yang secara khusus diselenggarakan oleh pendidik dan atau tenaga kependidikan yang berkemampuan dan berkewenangan di sekolah. Salah satu kegiatan ekstra kurikuler yang dilaksanakan di SMA N 1 Tambun Selatan, adalah ekstra kurikuler Pramuka, dimana ekstrkurikuler Pramuka merupakan jenis ekstra kurikuler Krida (bersama Paskibra, PKS, PMR), yang mempunyai visi berkembangnya potensi, bakat dan minat secara optimal, serta tumbuhnya kemandirian dan kebahagiaan peserta didik yang berguna untuk diri sendiri, keluarga dan masyarakat.

2. Maksud dan Tujuan

Maksud laporan ini adalah:

a. Mendeskripsikan pelaksanaan kegiatan ekstra kurikuler Pramuka di SMA Negeri 1 Tambun Selatan

b. Memaparkan perkembangan kegiatan ekstra kurikuler Pramuka di SMA Negeri 1 Tambun Selatan

Tujuan laporan ini adalah:

a. Mempublikasikan kegiatan ekstra kurikuler Pramuka di SMA Negeri 1 Tambun Selatan

b. Evaluasi kegiatan ekstra kurikuler Pramuka di SMA N 1 Tambun Selatan

3. Masalah Pokok yang Dilaporkan

Masalah pokok yang dilaporkan adalah bagaimanakah pelaksanaan kegiatan ekstra kurikuler Pramuka di SMA N 1 Tambun Selatan

4. Pendekatan dan Sistematika Laporan

Pendekatan yang digunakan dalam laporan ini adalah Analisis deskriptif kualitatif

Sistematika Laporan Kegiatan Ekstrakurikuer ini terdiri dari Pendahuluan (Latar Belakang, Maksud dan Tujuan, Masalah Pokok yang Dilaporkan, Pendekatan dan Sistematika Laporan), Data Peserta, Data Kegiatan, Prestasi, Masalah yang Dihadapi, Analisis Masalah, Kesimpulan dan Saran.

B. Data Peserta

Peserta kegiatan ekstra kurikuler Pramuka adalah siswa/siswi SMA N 1 Tambun Selatan yang secara sukarela megikuti kegiatan ekstra kurikuler Pramuka.

Daftar peserta terlampir.

C. Data Kegiatan

Kegiatan-kegiatan ekstra kurikuler Pramuka yang telah dilaksanakan dalam tahun pelajaran 2007/2008, meliputi kegiatan-kegiatan yang bersifat rutin, kegiatan-kegiatan yang bersifat khusus dan kegiatan-kegiatan undangan dari pihak lain.

Kegiatan rutin yang diselenggarakan berupa, latihan rutin. Kegiatan yang bersifat khusus, berupa kegiatan perkemahan sabtu minggu (persami), gladian pemimpin sangga (DIANPINSA), latihan bersama gudep lain, dan kegiatan khusus lainnya. Sedangkan kegiatan undangan dari pihak lain, berupa gladian pimpinan satuan (DIANPINSAT), Raimuna, dan Lomba.

Daftar kegiatan terlampir.

D. Prestasi

Prestasi yang telah diraih Gugus Depan SMA N 1 Tambun Selatan, selama tahun 2007/2008 adalah:

1. Juara III Gudep Tergiat Putra pada kegiatan Raimuna Ranting Tambun di Lapangan Gor Tambun

2. Juara I LCTK Kepramukaan dan Penanggulangan Narkoba pada kegiatan TKP3N se-eks Karisidenan Bekasi di Cikarang

3. Juara II LKIR Kepramukaan dan Penanggulangan Narkoba pada kegiatan TKP3N se-eks Karisidenan Bekasi di Cikarang

4. Tiga anggota terpilih mewakili Kwarcab Bekasi mengikuti Perkemahan Wirakarya Daerah yang diadakan Kwarda Jawa Barat di Bekasi.

E. Masalah yang Dihadapi

1. Minimnya peserta ekstra kurikuler Pramuka.

2. Belum adanya ruang Pramuka sehingga banyaknya peralatan Pramuka yang hilang, dan administrasi yang tercecer.

F. Analisis Masalah

Dari masalah yang dihadapi dapat dianalisis beberapa penyebab permasalahan yang terjadi:

1. Pelaksanaan ekstra kurikuler Pramuka, yang dilaksanakan hari Jumat pukul 13.00-15.00, pelaksanaanya bersamaan dengan ekstra kurikuler lainnya. Kegiatan ekstra kurikuler lain yang dilaksanakan hari Jumat antara lain: PMR, Olah raga, Seni Tari, Seni Musik dan Rohis.

2. Memasuki semester kedua terjadi penurunan drastis jumlah peserta Pramuka, dikarenakan kegiatan siswa yang padat, berupa kegiatan kewirausahaan.

3. Belum adanya ruang pramuka, mengakibatkan banyaknya peralatan Pramuka yang hilang, seperti tali, pasak, lampu, kompor dan lain-lain. Selain itu karena belum adanya tempat penyimpanan yang layak, kegiatan pramuka masih menginduk di ruang OSIS. Akan tetapi karena padatnya kegiatan OSIS, dan juga longgarnya pengawasan, maka administrasi pramuka banyak yang tercecer. Akan tetapi dikarenakan jumlah ruang di SMK, masih terlalu sedikit dibandingkan kebutuhan, sehingga ruang untuk Pramuka belum dapat terrealisasi.

G. Kesimpulan

Dari laporan di atas dapat ditarik kesimpulan sebagai berikut:

Kegiatan ekstra kurikuler Pramuka di SMA Negeri 1 Tambun Selatan, telah dilaksankan dengan sebaik mungkin, kegiatan yang direncanakan dalam progrram kerja, telah dilaksankan dengan baik dan dibuktikan dengan beberapa prestasi yang telah diraih, akan tetapi masih ada maslah berkaitan dengan kegiatan ekstra kurikuler Pramuka, yaitu minimnya minat siswa/siswi SMA Negeri 1 Tambun Selatan dan belum adanya ruang khusus tempat penyimpanan perangkat administrasi dan peralatan Pramuka.

H. Saran

Saran yang dapat disampaikan untuk pengembangan kegiatan ekstra kurikuler Pramuka selanjutnya:

1. Perlunya tempat/ruang khusus untuk kegiatan ekstra kurikuler Pramuka, supaya administrasi dan peralatan bisa lebih tertata dan meminimalkan resiko kehilangan peralatan

2. Perlunya sosialisasi lebih gencar untuk lebih menarik minat siswa/siiswi SMA Negeri 1 Tambun Selatan mengikuti kegiatan ekstra kurikuler Pramuka.

Naskah Pidato Hari Kartini

0 komentar

Yang terhormat Bpk Lurah Desa Sukamandi,
Yang kami hormati para Bapak Ketua RW,
Bapak2 Ketua RT 05
Rekan2 remaja dan pemuda se-wilayah sukamandi
Hadirin dan hadirat yang mulia,

Assalamualaikum Warahmatullahi Wabarakatuh.
Selamat sejahtera dan berbahagia juga kami sampaikan kepada hadirin dan hadirat yang beragama selain Islam.

Pada pagi yang berbahagia ini marilah kita bersama sejenak merenung dan berdoa, semoga kita yang hingga pagi ini masih dikaruniai kebahagiaan oleh Tuhan yang Maha Kuasa, diberi kekuatan untuk bersyukur senantiasa, atas rahmat dan hidayah dr Tuhan yang Maha Kuasa. Rasa syukur itu marilah kita buktikan dengan tetap menjalankan kewajiban dan tetap menjauhi larangan Allah Tuhan Yang Maha Adil.

Selanjutnya pd pagi yang berbahagia ini, hndaknya kita jg brsyukur atas kesempatan oleh Allah Tuhan yang Maha Kasih, yang dengan rahmat-Nya pula kita bisa brsama-sama mengadakan upacara mmperingati “Hari Kartini”. Nama Kartini, sudah tidak asing lagi. Bahkan dalam kehidupan sekarang ini tlah terpatri suatu sikap, khususnya sikap para Ibu, sikap para remaja dan pemudi puri, yang mencerminkan cita2 luhur ibu Kita Kartini.

Sebagai wanita yang tentu tidak bisa meninggalkan kodratnya sebagai perempuan, maka sekarang kian tampak bahwa dalam mendudukkan dirinya sebagai sesama pejuang bangsa, telah dapat menenmpatkan diri wanita Indonesia sebagai pejuang yang tidak ingin dikatakan nomor dua terhadap para kaum laki-laki.

Itulah sikap tegas kaum wanita yang secara langsung mencerminkan keluhuran cita-cita Kartini. Sikap itu juga memperlihatkan betapa hak azasi manusia Indonesia ini sangat diperhatikan. Terlebih hak wanita dalam menempatkan diri ikut serta membangun nusa dan bangsa Indonesia.

Tidaklah berlebihan kiranya jika wanita sekarang ini sudah mampu berbicara sejajar dengan kaum laki-laki. Bahkan di desa kita ini telah banyak wanita yang kedudukannya malah lebih tinggi dari sebagian kaum laki-lakinya. Ini menunjukkan bahwa bangsa kita khususnya kaum wanita benar-benar telah menyadari betapa pentingnya peranan dan kemampuan wanita dalam menegakkan kehidupan berbangsa, bernegara dan bermasyarakat.

Hari Kartini senantiasa kita peringati setiap tahun. Namun hendaknya janganlah pada saat-saat peringatan ini saja kita menampilan hasil karya dan cipta kaum wanita. Nmaun lbh daripada itu, mudah-mudahan setiap hari, setiap masa wanita Indonesia, tetap berjuang dan tetap bercitra, sebagai bangsa yang harum namanya.

Semoga Tuhan senantiasa meridhoi kita, khususnya para wanita Indonesia dalam menegakkan kehidupan berbangsa dan bernegara. Semoga kaum wanita bertambah jaya, bertambah perkasa dalam menjaga nama besar bangsa, negara, masyarakat, dan jangan lupa, semoga tetap jaya dalam menjaga nama baik keluarga. Amin!

Cukuplah sekian dulu sambutan kami, billahitaufiq walhidayah,
Wassalamualaikum Warahmatullahi Wabarakatuh.

Resensi Novel

0 komentar

RESENSI NOVEL

Mencium Vanessa


Judul Asli : Kissing Vanessa

Penulis : Simon Chesire

Penerjemah : Monica Dwi Chresnayani

Penerbit : PT Gramedia Pustaka Utama, Jakarta 2004

Ukuran Buku : 20 cm

Tebal : 208 Halaman

Sumber : -


Kevin adalah seorang murid di sebuah sma, berambut pirang, berkacamata, dan mempunyai hobi di bidang fotografi. Kali ini dia memasuki semester baru dengan tekad untuk berubah, kevin ingin memiliki pacar, ya, pacar seperti yang dimiliki sahabatnya "Jack". Sekolah Kevin memiliki tatanan ruang yang bagus dengan ibu kepala sekolah yang lumayan mm.. well galak. Suatu hari saat kevin melamun dikelas, memperhatikan objek yang akan difotonya (kevin selalu membawa kamera kemana-mana dengan alibi ketertarikannya di bidang fotografi) terfokus dengan objeknya, namun, tiba-tiba semua berubah saat gurunya membawa masuk seorang murid perempuan pindahan.

Vanessa.. nama itu selalu bergeming di telinga Kevin, dia jatuh cinta di pandangan pertama. Berbagai usaha dilakukan Kevin untuk menarik perhatian Vanessa, mulai usaha kecil, sampai berguru pada Jack sahabatnya, namun usaha itu malah membuatnya semakin buruk di mata Vanessa. Suatu hari Kevin menyadari Vanessa memiliki hobi yang sama dengannya "Fotografi", dengan fotografi akhirnya mereka menjadi semakin dekat, namun masalah datang saat Vanessa memajang foto ibu kepala sekolah yang murka akibat ibu kantin menjatuhkan makanan di sepatunya. Kevin berusaha membantu Vanessa, dan saat itulah hubungan mereka semakin dekat, dan titik terang dihadapan, tiba-tiba Kevin mengutarakan ketertarikan kepada Vanessa, dan akhirnya mereka berciuman. Kissing Vanessa…

Tugas Jaringan Komputer (Menghitung Subnetmask Class C)

0 komentar

Perhitungan Subnetting pada IP Address Class C

Subnet mask Class C

255.255.255.0

Network berada pada 3 basis dari depan, dan basis terakhir merupakan hostnya.

Subnet mask Class C dijadikan binary :
11111111.11111111.11111111.0

Untuk menentukan subnet Id dari host Id diperlukan peminjaman digit dari host Id.

Dalam subnetting ada sebuah rumus, yang menentukan jumlah subnet work, rumusnya yaitu power of two :

2^n – 2 = jumlah subnet work

Pada kasus kali ini, kita membuat 5 subnet work dari kelas C, maka perhitungannya adalah sebagai berikut :

2^n – 2 = 5
2^n = 7
2^2 < 2^n <2^3

Dalam perhitungan diatas diambil n = 3, karena 7 lebih dekat dengan 2^3, nilai 3 menunjukan jumlah digit yang dipinjam dari host Id.

Penjabaran host Id yang didapat berjumlah 3 digit :

255.255.255.000
255.255.255.001
255.255.255.010
255.255.255.011
255.255.255.100
255.255.255.101
255.255.255.110
255.255.255.111

2^7 2^6 2^5 2^4 2^3 2^2 2^1 2^0
128 64 32 16 8 4 2 1


Subnet mask dalam biner :

11111111.11111111.11111111.00000000 = 0
11111111.11111111.11111111.00100000 = 32
11111111.11111111.11111111.01000000 = 64
11111111.11111111.11111111.01100000 = 96
11111111.11111111.11111111.10000000 = 128
11111111.11111111.11111111.10100000 = 160
11111111.11111111.11111111.11000000 = 192
11111111.11111111.11111111.11100000 = 224

Menentukan subnet Id terakhir, broadcast (Batas akhir dari suatu subnet Id)
Untuk melihat broadcast id kita lihat angka decimal subnet berikutnya dikurang satu.

0 sampai 31 = Subnet Awal
32 sampai 63
64 sampai 95
96 sampai 127
128 sampai 159
160 sampai 191
192 sampai 223
224 sampai 255 = Subnet Akhir

Id awal merupakan subnet Id, sedangkan Id terakhir merupakan broadcast Id.

Aturan dalam Subnetting :

Baris awal dan akhir subnet work adalah subnet Id yang tidak digunakan oleh host manapun.

Untuk menentukan valid host, diambil host Id yang ada diantara subnet Id dan broadcast Id dan subnet awal dan akhir dihilangkan.

Vaild hostnya adalah :

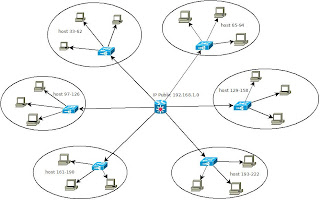
33 sampai 62
65 sampai 94
97 sampai 126
129 sampai 158
161 sampai 190
193 sampai 222

Jadi, valid host diatas merupakan IP address yang digunakan dalam setiap sub network.

Berikut adalah gambar dari hasil perhitungan Subnetting mask pada Class C :


PEMBUATAN APLIKASI / REKAYASA PERANGKAT LUNAK PRAKALKULASI HARGA

0 komentar

Seiring berjalannya waktu, dalam dunia bisnis yang persaingannya semakin ketat, setiap perusaahan berlomba-lomba untuk meningkatkan daya saingnya dengan perusahaan lain. Dalam hal ini khususnya bidang yang sangat berperan penting dalam meningkatkan daya saingnya adalah pada bidang pemasaran. Oleh sebab itu dibutuhkan solusi-solusi dalam menghadapi persaingan yang ada yaitu dengan memacu kinerja sales dalam mencari customer sebanyak-banyaknya. Perkembangan komputer membantu memudahkan manusia dalam melakukan pekerjaan guna mendapatkan informasi yang lebih mudah dan cepat dilakukan.

Prakalkulasi harga merupakan suatu metode dalam proses perhitungan harga penawaran yang dilakukan oleh sales saat bertemu dengan customer. Mobilitas sales yang cukup tinggi merupakan salah satu alasan yang membutuhkan sebuah proses perhitungan yang dapat dilakukan dengan cepat, efisien dan juga terkontrol ataupun terkoreksi dengan baik.

Untuk menangani kinerja sales tersebut diperlukan sebuah aplikasi atau perangkat lunak dalam proses penyampaian sebuah sistem informasi yang memiliki kemampuan dalam penanganan proses perhitungan yang dilakukan dengan secepat mungkin. Kegiatan Prakalkulasi harga ini dibuat untuk sebuah perusahaan manufacture pada industri kemasan. Dan data-data yang dihitung adalah penentuan harga bahan-bahan pembuat kemasan seperti bahan Film (Alumunium Foil, Celophane atau bahan sejenis plastik), harga bahan kimia atau bahan pembantu, harga bahan-bahan tinta atau bahan pengencer tinta, dan harga tarif mesin yang digunakan pada proses percetakan suatu kemasan yang menghasilkan produk kemasan obat, makanan, minuman, dan jamu. Untuk harga bahan, komponen harga yang digunakan merupakan harga standart. Harga standart maksudnya adalah harga yang telah ditentukan oleh manajemen yang sudah ditentukan dalam kurun waktu periode tertentu. Tarif mesin pun sama yaitu berdasarkan kebijakan yang dilakukan oleh manajemen. Harga dapat selalu berubah sesuai dengan kebijakan manajemen.

Untuk mengatasi masalah tersebut, maka penulis membuat suatu aplikasi dengan judul Pembuatan Aplikasi Prakalkulasi Harga Dengan Menggunakan Borland Delphi 7.0 dan Database Microsoft Access 2003 dimana aplikasi ini digunakan dalam hal perhitungan Prakalkulasi Harga yang dilakukan oleh sales kepada customer secara terkomputerisasi yang berdatabase dengan mencetak hasil perhitungannya secara langsung.

PARAGRAF DEDUKTIF DAN KATA TRANSISI

0 komentar

Teori

Paragraf adalah susunan dari beberapa kalimat yang terjalin utuh, mengandung sebuah makna, dan didalamnya terdapat gagasan utama. Paragraf deduktif dan Induktif adalah salah satu contoh paragraf yang dilihat dari letak gagasan utamanya.
Paragraf deduktif adalah paragraf yang kalimat utamanya terletak di awal paragaraf dan dilengkapi dengan kalimat penjelas sebagai pelengkapnya. Paragraf ini diawali dengan pernyataan umum dan disusul dengan penjelasan umum.
Kata-kata transitif digunakan untuk menggabungkan ide-ide, kalimat-kalimat dan paragraf-paragraf

Contoh

Berikut adalah contoh dari Paragraf Deduktif yang didalamnya terdapat kata Transisi :

Di dalam hidup ini, tidak ada jalan pintas untuk sukses sejati. Kalaupun ada, pasti ada “harga” lain yang harus dibayar untuk itu. Sayangnya, kita seringkali kurang sabar dalam mencoba meraih cita-cita. Bila fokus pikiran kita dipenuhi keinginan mencapai sukses sacara singkat, maka langkah yang kita ambil bisa cenderung negatif. Bisa menghalalkan semua cara, melanggar hukum, bahkan tega mencelakai siapa pun yang mencoba menghalanginya memperoleh sukses secara instan. Untuk apa mengejar “sukses dengan jalan pintas” kalau hanya penyesalan yang didapat di kemudian hari? Jika sikap mentalitas seperti ini yang dimiliki, kita tidak akan bisa menjadi manusia tangguh dalam menghadapi segala ujian dan cobaan. Sesungguhnya kenikmatan kesuksesan justru berada pada nilai proses perjuangan yang kita lakukan dan kemampuan kita mengatasi setiap halangan yang menghadang !
Oleh sebab itu, kita harus mampu memperjuangkan dengan penuh semangat, pantang menyerah, demi terwujudnya kesuksesan yang kita harapkan tanpa melalui jalan pintas.

 
Designed by: Indra Purnama | Bloggerized by Dhampire